Pages

Monday, 26 March 2012

Light Lemon Pepper Asparagus Linguini

Light Lemon Pepper Asparagus Linguini

This is a revisit....or rather, a photographic revisit ;-) I've been making this for years now, it first appeared on my first vegetarian blog (with parmesan) and then on this blog back in 2009 but with such a bad photo I've since deleted the post! I'm so happy my photos have improved since then :-)

I originally based this recipe on one I found online years ago. Sadly the link seems to be no longer available so I cannot give credit but it was featured as a light low calorie pasta dish using the asparagus stalks to make the sauce instead of heavy cream and/or tons of cheese. It's a really nice light and fresh tasting pasta perfect for the upcoming asparagus season. (My most favourite season!)

You can stir in some melty mozza cheezly into it before serving for extra flavour; some nutritional yeast sprinkled in works too. I have tried both before to try and replace the parmesan that the original recipe called for....However, I personally like the simplicity of this dish without anything more added and just letting the natural lemon, pepper and asparagus flavours shine :-)


I served mine with a couple slices of garlic bread and a chilled glass of white wine - a lovely dinner.

Light Lemon Pepper Asparagus Linguini


Light Lemon Pepper Asparagus Linguini: serves 2

150 grams asparagus - tough stems removed, about 1 bunch.
1 1/2 tsp salt (don't worry - it's for the cooking water!)
2 tsp extra virgin olive oil
Zest of 1 lemon
150 grams linguini, dry weight
lots of freshly ground black pepper
fine sea salt to taste

♥ The only ingredients! ♥

Bring a large pot of water to a boil. Snap tough ends off asparagus. Cut stems into 1 inch pieces and reserve tips separately. Add salt and asparagus stems to the boiling water. Cook stems until very tender, 6 - 8 minutes. Remove with a slotted spoon and refresh under cold running water. Reserve.

Add asparagus tips to boiling water and cook until just tender, 3 - 5 minutes. Remove with slotted spoon and refresh under cold running water. Reserve, still keeping them separate from stems.

In a food processor, combine asparagus stems, olive oil, lemon zest and just under 1/4 cup of the cooking water. Process until smooth and set aside. Return the remaining water to the boil and add pasta and cook until almost al dente (check package instructions). Drain, reserving 1/2 cup of the cooking water.

Return the pasta to the pot with the sauce, asparagus tips, and lots of freshly ground black pepper to taste. Cook, stirring over high heat until sauce is thickened, about 3 - 5 minutes. Add more pasta cooking water, a little at a time if sauce gets too dry. Serve immediately.

Light Lemon Pepper Asparagus Linguini


Nutritional Information: per serving

Calories: 314
Fat: 5.9g
Sat Fat: 0.9g
Fibre: 3.8g
Carbs: 55.6g
Sugar: 4g
Sodium: 612mg

You Might Also Like:


Tuesday, 20 March 2012

10 Layer Chocolate Orange Truffle Cake

10 layer chocolate orange truffle cake

♥ A most appropriate cake for my son's 10th birthday! A layer for each year :-) ♥

10 layer chocolate orange truffle cake

♥ Chocolate cake layered with zesty orange buttercream and covered in a chocolate orange truffle ganache ♥

10 layer chocolate orange truffle cake

♥ Decorated simply with vegan chocolate orange buttons ♥

10 layer chocolate orange truffle cake
I had bad lighting when taking photos of the cake whole :-( The cake slice photos are more representative of how the cake really looked. Surprising how much differences in natural light can make!


10 layer chocolate orange truffle cake

Well, I had to make a rather special cake for the boy's 10th! Sure, it took 4 days to make and it is the most calorific cake I have made to date but it's all worth it :-) This cake tastes as good as it looks and is one of those cakes that when the first slice is taken out people actually gasp as it looks pretty much like a normal cake from the outside.

It is a little tricky to make but mostly just time consuming as you have to cook each cake layer individually here. Slicing a large cake into ten layers would never work, the layers would just crumble apart; but, plan in advance and it should all go smoothly. This was my first time attempting such a cake and as you can see it turned out great, just don't rush it! 

10 layer chocolate orange truffle cake

There is nothing really new with the ingredients here, the cake is the bog standard wacky cake recipe that's out there that I always use when I want a chocolate cake. It has the best taste and texture, has no hard to find ingredients and basically never fails - what's not to love? I have used this as the base for many of my cakes and probably always will. Finding a similarly consistent white cake however is an ongoing quest ;-)

It is frosted with an orange buttercream bursting with orange flavour and the ganache is based on the same one I used in the Double Chocolate Mousse Layer Cake and the Chocolate Mousse Dome Cake using Cointreau instead.

Despite having 10 layers this cake still only uses the same amount of cake batter that I would use if I was making a standard cake so it's not like this is 2 or 3 cakes in one. The decadent factor comes in as you need quite a bit more buttercream to frost 10 layers than you would with a regular double layer cake, even when the frosting is kept quite thin. This does make this a very rich cake, you want the slices as thin as possible here, which can be hard to cut with 10 layers so we sliced it into 16 slices as it's kind of the thinnest you can get it. I then even halved my slice but others were able to eat the whole slice no problem :-)

10 layer chocolate orange truffle cake

The longest part is making the layers. If you only have 2 cake pans like I do you'll have make enough batter for 4 layers. Bake the 2 layers, remove them from the pan and pour in the rest to bake. I then let these 4 layers cool then covered them with cling film and put them in the freezer. The next day I did the same thing again so I then had 8 layers in the freezer. Then I made half the amount of batter to make the final 2 layers and also popped them in the freezer.

What you don't want to do is make all the layers in one go, even if you have all day. Reason being is baking soda loses it's effectiveness in a batter if it doesn't get into the oven within 15 minutes. This is why you'll have to make the batter in stages rather than making one big bowl of batter and just removing the cakes from the pans and refilling with batter.

The day before I wanted this I took all the layers out of the freezer, they defrost really fast, like within half an hour. So while they were defrosting I made the buttercream, then frosted inbetween each layer then around the outside to give a smooth even finish. I left it like this until the frosting was no longer soft then made up the truffle ganache and poured and spread it all over. You then pop it in the fridge for the ganache to set and decorate as you wish. 

10 layer chocolate orange truffle cake

Friday, 16 March 2012

Vegan Butter Grilled Bagel Toasties

Vegan Chicken and Avocado Bagel
♥ Vegan Chicken, Avocado and Basil on Plain Butter Grilled Bagel ♥

Houmous, Sun-Dried Tomato and Basil Bagel
♥ White Bean Houmous, Sun-Dried Tomato and Basil on Butter Grilled Caramelized Onion and Poppyseed Bagel ♥

♥ Avocado, Tomato, Almond Feta and Basil on Butter Grilled Caramelized Onion and Poppyseed Bagel ♥

Peanut Butter and Banana on a Butter Grilled Multigrain bagel
♥ The Elvis Breakfast Bagel: Peanut Butter and Banana on a Butter Grilled Multigrain Seeded Bagel ♥

I've been having these for lunch lately and as they are so simple I was going to post the recipes on the food diary blog but you know what? They've been so delicious they've been promoted! I'm usually not keen on bagel sandwiches only because I find they are too thick to eat and for me bagels HAVE to be toasted. This way of grilling the bagel first works great as you don't end up squishing out all of your filling while grilling and the butter spread side gets nice and crisp with a wonderful "buttery" flavour, much better than grilling the bagel sandwich whole or by simply toasting the bagel first.

Oh, and I never know what to call vegan equivalents of meat and dairy products, am I supposed to give it a funny name? Chikn? Not use the word butter? "Margarine grilled" doesn't have the same ring to it. I never know, but part of me simply cannot purposely spell anything wrong! It's a vegan blog, you guys know I'm talking about the vegan versions ;-)

I was quite fancying something with vegan chicken and avocado and first came up with the chicken and avocado version and it was absolutely delicious. Then, I had made up some white bean houmous - long story short but I think I've developed an intolerance to chickpeas! As I could not live without houmous I had a go at making my usual houmous recipe with haricot beans as well as cannellini and it turned out perfect, I  couldn't even tell the difference and I had no reaction to it, thank God for that! Can you imagine a life without houmous? Me neither.

As I had some Caramelized Onion and Poppyseed Bagels (Tesco brand) I had a go at making another bagel toasty, this one screaming out for sun-dried tomatoes and basil. O.M.G - this was amazing! I love discovering new and delicious sandwiches. Sometimes I think I'm like Joey from Friends :-)

Lastly, as I wanted to include as many bagel variations as possible here and also had some multigrain seeded bagels I figured some peanut butter and banana a la Elvis would make another great version. Oddly enough I don't actually like banana with bread but my husband does so made that one for him and he loved it. Oh and it would also be delicious with vegan nutella instead of the peanut butter. If you live in Ireland, Spar's own label Hazelnut Spread is vegan!

Obviously there are loads of variations possible here, I didn't even get into any using vegan cream cheese! But here are a few simple and yummy options for you:

Thursday, 8 March 2012

White and Dark Double Chocolate Chip Cookies

Vegan White and Dark Double Chocolate Chip Cookies

♥ Perfect with an ice cold glass of coconut milk (Le BON lait!) ♥

Vegan White and Dark Double Chocolate Chip Cookies

Well, as I've said, I've gone cookie mad!!! These are simply another variation on my basic chocolate chip cookie but crammed full of dark and white chocolate chunks. I had to make these for my son who, although really liked the White Chocolate Lemon Macadamia Nut Cookies was begging me to make a "non-nut" cookie after I made the Dark Chocolate Orange Hazelnut Cookies. Seems the hazelnut was a nut step too far for the poor boy :-)

Vegan White and Dark Double Chocolate Chip Cookies

So, I opted for a double chocolate chunk cookie here and I've got to hand it the boy, I think these are my favourite so far. Un-Be-liev-able. For these I wanted a thinner, crisper cookie so used Vitalite instead of the Sunlite and they turned out perfect. Again, different vegan butters will yield different textures but they will all taste good! And, like the previous cookies these will work with regular granulated sugar instead of Golden Caster, it's just what I prefer here.

Vegan White and Dark Double Chocolate Chip Cookies


Double Chocolate Chip Cookies: makes 18

180g vegan margarine (3/4 cup)
140g golden caster sugar (2/3 cups)
1 tsp vanilla
200g plain flour (1 1/2 cups, level)
1/2 tsp baking powder
1/4 tsp baking soda
1/4 tsp salt
100g dark chocolate chips or chopped (2/3 cups)
100g vegan white chocolate buttons, broke into quarters (2/3 cups)

Preheat oven to 180C. Beat the margarine, sugar and vanilla until light and fluffy. Mix flour, salt, baking powder and baking soda together in a separate bowl. Stir dry into the sugar mixture with a spoon, until well blended then stir in chocolate. Drop with a tablespoon onto baking paper lined baking sheets and bake for 12- 15 minutes. They should be golden, particularly along the edges. Let cool on sheets for a few minutes to firm up then carefully transfer to a wire rack to cool. 


Vegan White and Dark Double Chocolate Chip Cookies


Nutritional Information: per cookie if you get 18

Calories: 182
Fat: 9.3
Sat Fat: 3.4g
Protein: 1.6g
Carbs: 22.9g
Sugars: 13.5g
Fibre: 1.0g
Sodium: 121mg

Monday, 5 March 2012

Dark Chocolate Orange Hazelnut Cookies


♥ Well, you can never have too many cookie variations, right?? ♥


These are a simple twist on my last post of White Chocolate Lemon Macadamia Nut Cookies. I was so impressed the the chocolate/citrus/nut combination I had to try a dark chocolate version. Orange and hazelnut became the obvious replacements here and this makes an outstanding cookie!  I love the texture of these with the crunchy roasted hazelnuts and chocolate chips and the burst of orange flavour is simply lovely with them both. 

Like the previous cookies you will get different results here depending on the brand of vegan butter. When I use Sunlite I get a softer fluffier cookie. When I use Vitalite I get a thinner, slightly more crisp cookie like my standard Chocolate Chip Cookie. Again, I couldn't pick a favourite, both ways are fantastic :-)

These took a little more prep than the White Chocolate Lemon Macadamia Nut Cookies as I like to skin then roast the hazelnuts first using the method I used in the Chocolate Frangelico Mousse Gateau. This involves boiling the whole nuts in water and baking soda causing the skins to peel fully off easily. Then they are roasted and finally chopped. Although it's an added step it's very easy and definitely worth it.


Dark Chocolate Orange Hazelnut Cookies: makes 18

180g vegan butter (3/4 cup)
140g golden caster sugar (2/3 cups) or regular granulated sugar.
200g plain flour (1 1/2 cups - level)
1/2 tsp baking powder
1/4 tsp baking soda
1/4 tsp salt
1 tsp fine orange zest, I use a microplane grater.
1 tsp vanilla extract
100g dark chocolate chips or a chopped bar (2/3 cups) 
80g chopped roasted skinned hazelnuts (2/3 cups)

Preheat the oven to 180C/350F and line a couple of baking sheets with baking paper. 

First prep the hazelnuts. Bring 500ml of water and 2 tablespoons of baking soda to the boil in a large sided pot. Give it a good stir and add the hazelnuts with caution as it will really foam up here! I take the pot off the heat when I add them just to be safe. Boil for about 3 - 4 minutes, don't leave it as it will continue to foam up and stir it now and again. Drain the nuts and run under cold water, the skins should just slip off now and you can pop the remaining ones off with your hands. Pat them dry as best you can in either a clean dishtowel or paper towels and place on a baking sheet with sides, or roasting tin. Roast for 15 minutes giving the pan a shake every 5 minutes. Remove and transfer to a plate to cool enough that you can handle them. Now chop them as you like, I made mine fairly small, and measure out the required amount.

Whisk together the flour, baking powder, baking soda and salt in a bowl. In a large bowl beat together the vegan butter and sugar until light and well blended. Add the orange zest and vanilla extract and mix well. Add the flour mixture and mix with a wooden spoon until it just comes together. Add the chocolate and hazelnuts and stir until evenly mixed. Drop by a tablespoon onto the lined sheets a couple of inches apart, as these don't spread out a lot while baking don't pile them too high, you can even give them a little pat down. Bake for 12 - 15 minutes or until lightly golden at the edges and firm to the touch. Remove from the oven and leave on the tray for a couple of minutes then transfer to a wire rack to fully cool.

Unlike the white chocolate lemon version of these which went beautifully with a cup tea you'll definitely want to get the coffee on for these ;-)


Nutritional Information: based on 1 cookie out of 18

Calories: 162
Fat: 8.4g
Sat Fat: 2.4g
Protein: 2.1g
Carbs: 19.9g
Sugars: 10.7g
Fibre: 1.1g
Sodium: 110mg

Thursday, 1 March 2012

White Chocolate Lemon Macadamia Nut Cookies

Vegan White Chocolate Lemon Macadamia Nut Cookies

Cookies so posh I had to bring out the good linen!

Vegan White Chocolate Lemon Macadamia Nut Cookies


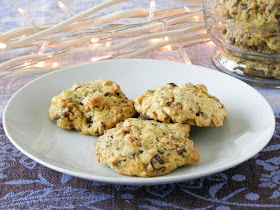
Ah, the white chocolate macadamia nut cookie - a classic! I can't believe it's taken me so long to make these since falling in love with the Sweet William Vegan White Chocolate Buttons but better late than never ;-) For me these were just screaming out for a subtle hint of lemon and it works so well here. All of us loved these, even my boy who usually shuns anything with nuts in it. They taste outrageously good - these are definitely going on the regular cookie rotation! 

For these I used my standard chocolate chip cookie recipe but swapped the white and brown sugar with golden caster sugar and of course swapped the plain chocolate chips for white chocolate buttons and macadamia nuts and added some lemon zest. Now, different brands of vegan margarine will give you different results here, the first 2 times I made these I used "Sunlite" Spread available here in Ireland and I got a softer fluffier cookie and is the one you see in the photo here. The 3rd time I made these I used Vitalite and got a thinner, slightly crisper cookie, more like my traditional Chocolate Chip Cookie. Both versions were still absolutely delicious (I couldn't choose a favourite) but just so you are aware that different vegan butters will yield different results.

Also, as golden caster sugar is probably one of those "weird UK/Eire ingredients" I did test these with regular granulated sugar and they turned out just fine, in fact I'm sure any sugar will work here.

White Chocolate Lemon Macadamia Nut Cookies - makes about 18

180g vegan butter (3/4 cup)
140g golden caster sugar (2/3 cups) or regular granulated sugar.
200g plain flour (1 1/2 cups - level)
1/2 tsp baking powder
1/4 tsp baking soda
1/4 tsp salt
1 tsp fine lemon zest, generally from 2 lemons, I use a microplane grater.
1 tsp vanilla extract
100g vegan white chocolate buttons, chopped (2/3 cups) I like to break the buttons into quarters.
80g chopped unsalted macadamia nuts (2/3 cups)

Preheat the oven to 180C/350F and line a couple of baking sheets with baking paper. Whisk together the flour, baking powder, baking soda and salt in a bowl. In a large bowl beat together the vegan butter and sugar until light and well blended. Add the lemon zest and vanilla extract and mix well. Add the flour mixture and mix with a spoon until it just comes together. Add the white chocolate and macadamia nuts and stir until evenly mixed. Drop by a tablespoon onto the lined sheets a couple of inches apart and bake for 12 - 15 minutes or until lightly golden at the edges and firm to the touch. Remove from the oven and leave on the tray for a couple of minutes then transfer to a wire rack to fully cool.

Vegan White Chocolate Lemon Macadamia Nut Cookies

 Now lay out your best linen, get a large pot of Earl Grey tea on and call the neighbours over to impress them :-) 

Vegan White Chocolate Lemon Macadamia Nut Cookies


Nutritional Information: per cookie, will vary on brands used.

Calories: 168
Protein: 1.7g
Fat: 9g
Sat Fat: 2.6g
Fibre: 1g
Carbs: 20.7g
Sugar: 11g
Sodium: 111mg

You Might Also Like: 

Cranberry White Chocolate ShortbreadBig Chocolate Chip Orange Cookies